Showing posts with label sewing. Show all posts

Tuesday, 29 October 2013

Sewing in the Forties

Hey everyone,

I've just come across this short film by Simplicity from 1948. If you have a spare 20 minutes I heartily recommend getting yourself a cuppa and enjoying the sewing adventures of Betty. Some of the language is amazingly twee and outdated but the fashions are still current and being re-worked by designers the world over even now. I think this is a real gem and the sewing techniques and tips are current even now.
Happy viewing!

 Blog signature


Sunday, 27 October 2013

Simplicity wrap skirt


 Happy Sunday one and all,

I trust you've all had suitably fab and relaxing weekends. After drinking more tea that should be humanly possible this morning, whilst listening to my vinyl Vera Lynn album (my new theme song is It's a Lovely Day Tomorrow) and reading trashy home mags, I finally launched myself into the day.

After a slight delay I finished my Simplicity 7352 wrap skirt and I have to say I'm pretty darn happy with it. My variations to the pattern included:
  • making the skirt reversible by adding a contrasting fabric but I kept the yokes the same on both sides
  • I added several inches length to the ties since those suckers are always far too short for my liking
  • I top stitched the whole thing 1/8 inch which took a while but was worth  it
 
The very cute sewing themed fabric
I also toyed with the idea of adding a pocket at the side seam which would have probably been ok but having tried it on I'm glad I didn't as I fear it might have messed with the nice A-line effect.

All in all this was a super simple and straightforward make. I highly recommend it because the cut is really flattering on 99.9% of the population and is a classic style. It's quite similar to a modern pattern called the Miette doing the rounds at the moment by the lovely and talented Tilly of Tilly and the Buttons but mine is 37 years old!

Some of you may be thinking 'I don't know if a wrap skirt is for me. Don't those leave you with countless opportunities for unintentional knicker exposure'? I confess I also had these worries but they have been banished after trying this baby on. The back panels are of a very generous width meaning there's plenty to 'wrap around' if you know what I mean. If you were feeling particularly nervous about it though one solution could be the placement of a discreet press stud on the inside of the flap and outside of the skirt. A word of warning though, this can affect the drape of your skirt so you may want to get the help of a friend to place it carefully. You'd also need to do this before sewing the two sides together if it's reversible.

So, that's the end of my sewing adventures for another week. I hope you all have a great week ahead!

Blog signature

Wednesday, 23 October 2013

What's on the sewing table?

Hello one and all!
After my hiatus I am back and ready for a season of cosy, fireside activities. I'm not going to lie, I had a freaking amazing holiday. It was beyond lovely to spend some quality time with my folks in a place that wasn't one of our respective homes. We were all forced to chill out and relax and, as it turned out for Mum anyway, buy a whole lot of shoes (don't ask).

After a fab time in Hawaii I jetted over to LA (I love how that sounds) to see my best pal of all time and soul sister par excellence. I can't begin to describe how good for my soul it was being with someone who just gets me. After a few days together I felt like my old self again, that would be the best version of myself - great friends just bring that out in you don't they?

Anyway enough gushing. I'm now back in bonnie Scotland and there's been a definite Autumnal shift in the weather and the days are drawing in. This means two things. The first is that I need to get the garden 'put away' as my gardening guru Aunt would say. I am hoping to tackle the bulk of that work on Sunday. This also means factoring my interloping chook who not only has stayed on but who I am now trying to integrate with my two existing chookies. More to the point, Francois as I had named him, may in fact now be Francine. All the suspiciously cockerel-shaped tail feathers have disappeared and he is looking more and more like a she. Who knows but I feel responsible for the blighter now so we're all one big happy family from now on.

The second thing is the return big style of some crafts that are perfect for the fire side. I'm talking about crochet. In the spirit of the season I picked up Niki Trench's book Cute and Easy Crochet. I really like this book, it is full of projects I'm reasonably confident I can not only start, but finish (not always the case with craft books). I decided to tackle the chunky shell scarf but instead of using chunky wool I went for a teal 100% Shetland style wool and I'm pretty pleased with how it's coming along. It'll look better finished and pressed so I'll keep you posted. I'd forgotten how many odd looks crocheting in public can attract but it's a nice diversion on boring public transport journeys.


I've also been stitching a super sweet 1976 Simplicity wrap skirt pattern, with one or two hacks to make it more my style. I'll post a couple of pics of the finished article shortly. My skirt is the one with the ultra stylish pointed yoke (which required a moderate number of swear words to finish) and ties around the front. To say I found the greatest sewing-themed fabric ever to use on this project would be an understatement and pics will follow.

I also found myself lurking around eBay the other night when I happened on a couple of auctions for fab patterns finishing imminently. I bid and won both for the bargain price of £0.99 each! Result! Both are Simplicity patterns from 1967 and are from the Jiffy range, meaning they have only a few pieces and should be pretty speedy to whip up. I can't wait to get started!

So, I hope you have fulfilling projects to keep you distracted over the coming months. Apparently this winter coming is supposed to be a doozy and not in the good way so plenty of projects will be needed to see us all through.

Blog signature

Thursday, 19 September 2013

A holiday sewing distraction

This weekend I am heading off to the States for a couple of weeks. I'm meeting my parents in Hawaii and then heading to LA to see my best girlfriend of all time who moved there a few years back. I'm super excited to see the three people I love most in the world all in the space of just a few weeks, and to sneak in a cheeky second summer.

 I promised myself I wouldn't leave packing until the last minute but of course that's been an epic fail. I'm sitting here with only one day to go and absolutely nothing is packed or organised. I keep telling myself that it''s not a big deal since everyone tells me the shopping in the States is amazing so a half empty case is probably a good thing.

So what have I been doing instead of packing? Sewing of course. Apart from the Sorbetto tops I made for my Mum, I also decided a new tote bag would be essential. My idea was to make something that scrunched up when it wasn't needed but would go with most of my limited wardrobe options. I didn't use a pattern so this just evolved as the evening wore on. It started off by making 18 different squares from my favourite retro fabrics.
Initially I thought I'd just stitch two sets of nine squares together and that would form the front and back of the bag - simple! After I made the two panels however it became clear that it would definitely not be big enough to hold all the junk I need to cart about on holiday. To fix this I decided to add a gusset in a lime wool mix fabric. What followed at this point was a whole lot of swear words and unpicking but eventually the gusset was in and the corners, although not perfect, were not too bad.
Front

Back
To finish the bag off I added a lining, made the same way as the outer with a gusset (cue more swearing), and included a two-compartment pocket. Lastly I made two handles from an obliging pillow case and around midnight it was finally finished.

 Now if only I could put this sort of effort into the packing! Bon voyage my friends, see you in a few weeks.
Wishing I could look this chic after a full day's travel.
Blog signature

Monday, 16 September 2013

Sorbetto sewing adventures

A little while ago I wrote about a really quick and easy top I stitched up called the Sorbetto, you can see the original post here. I really enjoyed the process of following this simple free pattern and knew I'd make more as soon as the chance presented itself.

During the summer I made the top below but never got around to writing it up so here it is. The fabric came from an old sheet and I managed to find bias tape that perfectly matched the pale green in the design.


I also decided to make a couple of tops for my gorgeous Mum (who I hope doesn't read this before I get the chance to give them to her). It's funny how the process of sewing for someone other than yourself pushes you to improve your technique and finish garments to a higher standard. When I was sewing the two tops below for Mum I spent extra time doing French seam finishes and bias tape hemming. French seams are well worth the effort, particularly if you don't use an over-locker. For a simple tutorial have a look at this.  I'm hoping they fit well but if not, the Sorbetto would not be difficult to alter.

Left: Bias finished hem and French side seam  Right: French seam on shoulder
I think the next time round (because there will most definitely be a next time) I might add sleeves. If you're trying this at home I've found a very simple free download for a Sorbetto sleeve here.
Blog signature

Tuesday, 20 August 2013

Thrifty haul

Once or twice a year my favourite local thrift store, Charity Begins at Home, has a sale if you can believe it. Their prices are always incredibly reasonable, something you can't always say about an increasing number of thrift stores. Anyway, their sale involves knocking 50% off everything in the shop and I thought I'd share some of my finds. For only £20 I came away with some super haberdashery supplies, as well as fabric and the ever essential doily. The ladies who run the shop do a great job and were the well-deserving winners of the Queens Award for Voluntary Service this year.

Four yards of lovely soft fabric

Lace and doilies galore

Trims, zips and a rainbow of fabric

Monday, 29 July 2013

A quick messenger bag

Hello fellow bissums,

sorry for the radio silence. What with it being a glorious Scottish summer and all I've been out in the garden watching nature do it's thing. I've also been sunning myself in Venice for a week and nourished my creative soul and satisfied my desire to eat gelato for seven days on the run.

Anyway while I was in the Veneto, it struck me that the tea towel is surely one of the most ubiquitous of holiday souvenirs. It's a daily reminder of cheery times spent with people you love in (hopefully) unforgettable destinations. But eventually, the poor wee thing gets washed out and stained with lord knows what in the quest to keep your kitchen tidy. What if there was a way to combine everything that is functional and practical about the humble tea towel, with a stylish reminder of good times had on holidays I pondered?

I've had a little habit going for a while now of sorting through piles of tea towels in thrift shops and choosing the best ones to take home to add to my fabric family. I like to take a moment and imagine who purchased each one and how they felt about being in their chosen destination. Or perhaps it was an unwanted gift for someone who wasn't lucky enough to be at said destination. In any case my collection has grown steadily. I was most thrilled to find one of the old school calendar tea towels from the year I was born and some from the part of Scotland in which I now reside. I chose however, for this remake, to use a gorgeous tea towel from New Zealand, my home country which had a pretty collection of stamp images and a map of NZ. I should have taken a snap of her in her original glory before snipping her up.

Handy outside pocket on the back of the bag

Another handy little inside pocket
Anyway, after a little googling I came across a fab tutorial for a simple messenger bag and thought it was the very thing for my project. I used an old pillow case for the lining and a salvaged piece of navy corduroy for the main fabric. It was quick and simple to stitch up, no fastenings or zippers here. Next time you're thinking about ditching a pile of old tea towels think again and get thee to thy sewing machine pronto (like the way I casually dropped in some Italian lingo there?)!
xx


Wednesday, 26 June 2013

Sorbetto anyone?


Hello summer people!
With the warmer weather coming on (and going it has to be said) what better time is there for whipping up a quick and cute summer top? There's so much good will in the online sewing community which has meant there are some fabulous free pattern downloads available. One of the better ones comes from Colette in the form of the Sorbetto. Once you've cut out and stick-taped all the pattern pieces together it couldn't be quicker to sew one up.

I had a crack at this recently using some fabric from a thrifted bed sheet and some old bias binding I had lying around. The cost is probably less than 50p! Because the fabric is pretty busy I didn't add any embellishments this time. It's a very simple construction with no zips or buttons and just two bust darts along with the pleat down the front.

What would I do differently I hear you ask? I'd add about 10cm on to the bottom because this is almost too short for me to wear comfortably. I think it would be easy to re-draft this pattern into a dress by adding some length at the bottom and flaring it slightly. There's no end of images on Pinterest, Flickr and the like of variations on this classic design. I might even have another go at a new version tonight!

Thursday, 13 June 2013

Summer lovin'

Months of bleak grey skies and constant snow can sometimes make one think summer's don't exist in Scotland. Then you wake up one morning and there's been a definite change. The grass has started growing at a rate of knots and brave little flowers are poking their heads above ground. The last few weeks have meant generally glorious weather and I'm resolved yet again to hold on to the memories of all this loveliness when summer has passed.

As well as enjoying early morning cups of tea in the garden I've finally gotten around to making my doll face cushion. I've had this project in mind for many months now and can't believe I dragged my heels for so long. You could honestly whip this up in one night and I have a sneaky feeling more of these cuties will be popping up around the house in future. This little gal needs a guy to keep her company I think.


If you're in the mood to make one yourself here's some simple steps to follow.
  1. Trace a circle using your old school compass (if you still have it) onto a piece of paper making the diameter match your cushion pad. Add a small seam allowance but not too much, you want a nice snug fit. Cut out.
  2. Use the paper circle as a pattern to cut out one patterned piece of fabric (this will be the back of your cushion) and one plain piece (this will be the front face).
  3. Now using your paper circle, draw on the lips, cheeks and hair with pencil. Cut out each piece and use as a pattern to cut out on your chosen fabrics. I think it's fun to go a bit wild with the hair fabric and choose pinks and reds for the lips and cheeks.
  4. Pin the fabric face pieces to your front face circle and using a small zig zag stitch sew them on, sewing right at the edges. You want your stitch to catch the raw edges and enclose them to prevent fraying.
  5. Now you need to add some eyes. I drew mine onto the fabric with a fading marker pen. Then I placed the fabric into an embroidery hoop and back-stitched over the top of my outline.
  6. Place your finished front face piece right sides together with your backing circle and sew all the way round the edge leaving a big enough gap to insert your cushion pad.
  7. Turn inside out, insert the cushion pad and slip stitch the opening closed.
  8. Voila and your cushion is done! 

Monday, 27 May 2013

Simplicity made complicated

I hope you're all having a wonderful long weekend wherever you are. In an almost unheard of run of good weather in Scotland there was blazing sunshine on two consecutive days! It was truly glorious on Saturday and Sunday and I made sure to spend as much time outside as possible. On Friday evening however, I was inside cutting out yet another dress pattern and today on Monday it was windy and rainy, hence perfect sewing weather. I know I'll be going back to work tomorrow feeling relaxed and refreshed and with a new addition to my wardrobe.

On a recent thrift store trawl with my fellow bissum Marion I happened upon an original 1974 Simplicity Pattern (number 6764) for a really simple and cute dress, I think it cost the princely sum of 50p. I say simple, and it mostly was, except for the fact that it would require me to climb my own personal sewing Everest: putting in sleeves *pause for dramatic gasp*. I would be lying if I didn't say there was a fair number of curse words being used at the point of easing the sleeves in (by the way, the use of the word 'easing' in connection with sewing sleeves is completely inappropriate and lulls the unsuspecting sewer into a false sense of relaxation and confidence). After a fair amount of unpicking and re-sewing the sleeves were eventually attached at I can proudly tick that off my first-time list.


I also decided to get clever by adding a peter pan collar to the dress and patch pockets. The air positively turned blue when I was attempting to attach the collar but as always, I got there in the end and I'm reasonably satisfied with the result. I drafted the collar pattern by using the two pattern pieces for the front and back neck facing and that way it fitted perfectly. It also meant I could skip attaching the neck facing.
My Cath Kidston collar

I drafted my own pattern for the pockets and used a decorative box stitch to attach them. I also varied the pattern by cutting the front piece on the fold rather than in two separate parts to avoid the join. After cutting the pattern out I realised it was far too long and lopped a good couple of inches off the bottom. You need to be a little careful if you're doing this on a dress with flare like mine was. Cutting straight across the bottom is a no-no. You need to keep a slight upward curve at the side seams.
My patch pocket
The thing I really liked about this pattern was the shaping. It has two bust darts at the front and at the back it has shoulder darts, along with two more in the middle of the back, either side of the zip. The main fabric is a super soft cotton in a sweet candy pink colour and came from an old bed sheet. The contrast fabric is from a piece of sacred and much-loved Cath Kidston fabric which my favourite Aunt Isabel bought for my birthday a couple of years ago. I'm such a tightwad when it comes to using it that thus far it's only been cut into for the smallest projects, like this collar. The pink in it perfectly matches the main fabric though so it was a good choice. I finished the collar with an old grey/blue button.
Overall I thoroughly enjoyed making this dress and would definitely attempt it again. I'd make the body slightly smaller next time though and make the pockets bigger. I'd also be tempted to place the zip at the side rather than down the back.

Happy crafting fellow bissums!
xx

Sunday, 19 May 2013

A shifty little number

I recently treated myself to a new book, not just any book, a book which promised so much and built up high hopes in me that my sewing prowess would be dramatically increased upon reading aforementioned wonder book.

This book was BurdaStyle Sewing Vintage Modern by Nora Abousteit and Jamie Lau. If you've not taken the time to look at the Burda website yet you absolutely must! It full of amazing patterns (including some free ones) to download, with images posted by sewers of their creations, and all sorts of hints and tips.
I decided to purchase the hardcopy book because I much prefer being able to hold a pattern and instructions in my hand rather than go squint-eyed trying to read from a screen constantly. This book also had a high proportion of projects which I would actually like to make which certainly cannot be said for every craft book on the market.

The beauty of this concept is that there are five 'base' patterns - three dresses, one pair of trousers and a man's shirt and then there are umpteen variations which can be applied to the base patterns to configure nineteen different items in total.

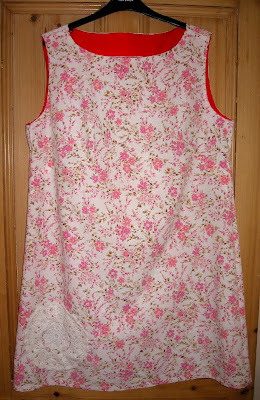
I decided to have a crack at the simplest pattern first, the Jamie shift dress. The most fiddly part was tracing the pattern off the master sheet onto pattern paper. From there it was just a matter of cutting out the four pieces and getting stitching. Couldn't be simpler!

The darker dress was my first attempt and I varied the pattern by attaching an exposed zipper instead of an invisible one. The facing was done in plain black cotton.

My second dress was in a lighter floral with red facing and a doily which was added for total satisfaction of my granny instincts. I decided to skip a zipper on this one altogether. Both fabrics were salvaged from vintage duvet covers.

Next time I'd definitely make these smaller. Don't skip the step recommended in the book about taking your measurements properly (like I did). I'd also like to make a version with a peter pan collar, a pocket and sleeves, although maybe not all three on the same dress.

If you wear dresses a lot like I do, this is most definitely a pattern you will use many times over. The A-line cut flatters absolutely any figure and once you have your pattern traced, you can whip one up in a maximum of  three hours I think (allowing for tea breaks and unpicking of mistakes).

I'm looking forward to cracking on with some of the other projects in the book and will keep you posted on progress. Let me know if you make anything yourself!

Tuesday, 14 May 2013

Dressmaking adventures

I followed the pattern for the middle dress
Well after what can only be described as the most shameful of lapses in blogging, I'm back in the room! I had a legitimate reason for five weeks of tardiness when my wonderful parents were visiting from Australia, but I have absolutely no explanation for the rest of the time. I do apologise most sincerely.

While I was slacking off I thoroughly enjoyed watching The Great British Sewing Bee. Most bloggers who have even a passing interest in sewing all became obsessed overnight with this program and wrote about it at length. I don't blame them. I'm not one for reality TV usually but this was both entertaining, educational and totally gripping. If you don't live in the UK and struggle to access the BBC you have my condolences but no doubt there's a national variation in the works in most places.

Anyway, whilst watching I felt a twinge of guilt come over me. We've all been there and it's a horrible feeling when you remember a long-forgotten project started many moons ago and then left to languish in the 'to do' pile. Mine was a 1966 Simplicity dress (pattern number 6840) which I started in 2011 (eeep) when my Mum was last over for a visit.
I hauled it out and was pleasantly surprised to see it was very near completion. I thought you might like to see the end result.

The pattern was purchased in a thrift shop if memory serves me rightly and the fabric came from an obliging bed sheet. I have to say I'm pretty pleased with the result overall and only struggled with easing the skirt onto the bodice and hopefully my teeny tiny resulting pleat is not noticeable.


The front of the bodice
The back of the bodice


Related Posts Plugin for WordPress, Blogger...